Sunday, October 18, 2015

Dig Site - Part 1/3 of Jewels & Equipment

This is the first in a planned set of three posts about jewels and equipment.

Part 1: Dig site - collecting jewels and monster missions
Part 2: Upgrading Jewels - increasing the bonus of jewels
Part 3: Equipment and Socketing jewels - adding jewels to equipment for use.


Dig Site

The dig site becomes available to players when they finish Teepee Hollow and can access Turtle Falls.  There are two purposes to the Dig Site: to use daily digs to collect jewels; and to send monsters on missions to earn loyalty points and troop experience points.


How to dig?

Within the Dig Site there are eight places to "dig" for jewels. The amount of daily digs allocated to you depends on your troop level, and they renew each day at the Battle Camp daily reset (5pm PDT).  The number of digs available to you can be seen above the Dig Site on the main game map, or above your avatar's head while you're within the Dig Site.

To use your daily digs, click on one of the either locations within the Dig Site that are indicated with the "Search" markers. There is no known advantage to which place you choose to dig as the prizes for the digs are random. Many people choose to use all of their digs in the one place so that the random nature balances out with their digs.

Winning a jewel and bone from a dig at the Dig Site

The prizes from the digs include level 1 and level 2 jewels, along with items used to send monsters on missions: bones, pebbles, metal ore, wood, leather, teeth, roots and seashells.  These latter items have no other purpose in the game.  Jewels will be discussed in more detail in part 2 of this series of posts.

Non-jewel items collected from the Dig Site (not runes or plans)

Understanding the Mission Board

The other part of the Dig Site is the ability to send a monster on a mission. Only one mission can be underway at a time. To send a monster on a mission, click on the Mission board at the center of the Dig Site screen.

Click on the Mission board to send a monster on a mission

After clicking on the Mission board, you'll see a number of available missions for you to select. (The higher your troop level, the more missions you may be able to choose from).  The missions are categorized by the rarity of the monster required to go on that mission - a monster of the same rarity (super on a super mission) will have a 50% chance of success, a monster of higher rarity (ultra on a super mission) will have a 100% chance of success.  Neither the percentage chance of success or the duration of the mission is effected by the feeding level of the monster - a level 1 rare will have the same 100% chance of success on a common monster mission as a maxed rare.

Each mission will provide you with a different level of loyalty points (coins with yellow stars) and troop experience (blue flag with XP written on it).  Loyalty points can be spent in the troop shop (see part 2 of this post series).  Troop experience is combined with experience gained by troop members donating stones to help level up your troop.  The amounts of loyalty points and troop experience are shown at the top of the mission screen - here I have 58 loyalty points accumulated and my troop is at level 6, with 42.3k of 50k experience required to level us up to level 7.

Each mission requires a different combination of components found during your daily digs.  Missions that appear in blue indicate that you have all the required components to send a monster on that mission, other missions will be in grey until you collect the components needed.  A blue flag indicates that your monster has competed its mission and is available for collection along with your reward.  The "N/A" timer icon shows if you've chosen to delete a mission. This is a process that takes 6 hours and will give you a new mission to choose from after that - it's a way to remove missions for which you don't have the required components for, or have no monsters that qualify. (For example, if I didn't have a spare epic monster to send on the epic mission, I may delete this mission on this screen by selecting that mission and clicking "delete mission").


Mission board showing a newly deleted mission with countdown (Left),
 and its appearance when a new mission is ready (Right).


How to Send a Monster on a Mission

Once you've chosen a mission that suits you, click on the mission to make sure that you have all the components needed. In the example screen below, I'm choosing the bottom left super mission that will earn me 19 loyalty points and 16 troop experience.

Selecting the bottom left Super mission

Press the "Choose Monster" button on the bottom of the screen to select a monster to send on a mission.  All of the monsters in your inventory (not including storage) that have the same or higher rarity as the mission will be available for you to select from.


The above screens show me selecting a super or an ultra for the mission.  Each time the mission duration, shown at the bottom of the screen, remains unchanged.  The chance of success is 100% for the ultra selections as its rarity is above a super, whereas the super only has a 50% chance of success.  Once you've chosen the monster, click "Go" and your monster will be sent on the mission.  The mission screen will begin the countdown (hours:minutes:seconds) until your monster returns for you to collect, along with the reward prizes.  The chosen monster will appear in your inventory but will be unavailable for use until after the mission is over and you've reclaimed your monster from the Dig Site. To reclaim your monster, click on the blue flag indicating the mission has finished, and then click the "Claim Rewards" button. Your monster will then be available in your inventory once more, and you'll be able to initiate another mission.


Mission screen showing the mission completion countdown (Left),
and a different completed mission (Right).


Why should Beginners visit the Dig Site?

Jewels, loyalty points and even troop experience are generally not things that beginner players are all that concerned with - they're features that impact higher level players more significantly.  However, everyone only receives a limited number of digs each day and sending monsters on missions to earn loyalty points (for making purchases in the troop store) is a very slow process.  There are no inventory limitations preventing you from starting the collection process early and building up a supply of jewels, mission components and loyalty points for later in the game when you'll really appreciate this head start that you've created for yourself.

Sending monsters on missions also helps build your troop's experience level, helping it to level up so that you receive a slight attack bonus and more items in the troop store.  It's an alternative to donating stones to your troop that costs you nothing but the unavailability of one monster for a while.

Event Spins Questions

From Husin: If u have gold. Which event mob would you spend to get it first? TW mob, Dom Mob or BR mob?

Dominion (Dom) monsters (mobs) have the best trading value currently.

Battle Royale (BR) offensive monsters have a slightly reduced value but the defensive monsters have minimal value.

Troop Wars (TW) monsters have even less value than that - they're only used every second event and only have their bonus against one element troop pet. (They have no bonus against the flag). The "old set" have especially low attacks.

The decision between Dominion and BR for spins is rather personal. If you work best individually, then BR may get you into a higher tier. If you have a good troop who can help gain double trophies in Dominion through teamwork, then Dominion monsters would be better. It would be relatively easy to trade dominion monsters for BR ones if you change your mind (the opposite scenario would be challenging to find trades for).

Good luck :)

Note to beginners: Other events have non-recurring event monsters. They have bonuses for single events only. Spinning during these events can give you a big advantage as everyone starts the event without event monsters. These can help you gain a high tier, but only for that single event. Subsequently many advanced players won't spin during these events unless there is a particular reward monster as an event tier  prize.


From Frodo: Are there any tricks to spins? Spin all at once or separate?

No one really knows how the spin engine works within the game with any certainty. There are people who have done over 200 consecutive spins (at 50 gold each!) without winning an epic, there are others who have won an epic in a single spin. Playing the spins is very much a form of gambling, and there are no easy ways to guarantee you'll be lucky.

The following is my own personal system, and it's very easy to find a multitude of people who have their own spin methodologies and superstitions... that's all we're really working with here: guess work!

I prefer to wait for lucky spin opportunities within the event environment. (Others say that the event spin has a better chance). As I have a collection of event monsters already, I wait for the special promotions - increased epic drop rates or free energy with spins. The latter tends to work as a form of "compensation" for bad spins within my thinking. ;)

18 months ago, as a relative beginner player, someone once told me in the game that they only ever spin four times in a row and that gave them good results. That stayed with me and I've tested it out and it feels like a good fit to my personal gambling risk-taking. If those four spins are bad, I stop spinning. (The times when I've chosen to keep spinning tends to lead me into a bigger collection of bad spins). If I receive something good, I'll add an extra two spins to my original four. Good luck with spins tends to come in groups, and often an ultra/epic is soon followed by something else good and I'll make sure to spin a couple of times more.

Again, this is all merely superstition... none of us know the tricks to these spins!

Thursday, October 15, 2015

Beginner's Guide to Dominion Event

Note: A newer version of this guide is now available. Click here to read the April 2017 Beginner's Guide to Dominion.

Dominion is an event that relies heavily on teamwork within your troop.  One hour matches occur every four hours throughout the event.  For each match your troop will be matched against a troop with similar troop trophies - power ratings are not taken into account.


How Dominion Works

When you enter the Dominion match, you'll notice that event area contains five towers, one for each element, and a Ranger down at the bottom of the screen.

You have the choice of which tower you wish to battle and how many energy you want to use.

For each tower that your troop has done more damage than the other troop, your troop is considered to have "claimed" that tower.  A blue flag will appear above the towers that your troop has claimed and a red flag appears above those that the enemy troop has claimed.  You can keep attacking a tower claimed by the enemy troop to try to beat their damage and claim the tower back for your troop.  Keep an eye on the towers as the changes are dynamic!

When your troop has claimed 3 towers, your troop will receive double trophies for each attack while you hold these towers.  Trophies are normally earned at 1 trophy per 1000 attack, but this will double after 3 towers are claimed.

For each tower that your troop has claimed, you'll earn 1 point per second.  The tally of points won by each troop can be seen by clicking on the Ranger at the bottom of the event screen.  Whichever troop has the most points (not collective damage!) at the end of the match will be declared the winner.  The winning troop will receive troop trophies equal to 2x the individually earned trophies.  The losing troop receives a 30% reduction in the individually earned trophies.  (Troop trophies count towards the troop tier rankings and prizes).

 Clicking on the Ranger will show you the points earned by both troops


General Troop Strategies

As points accumulate as soon as damage has been made on each tower, the key to success in Dominion is to have as many active players at the start of each match as possible.  Ideally, arrange to have different players attack a different tower each with 1 energy to claim as many towers as possible as soon as the match begins.  With luck, you may have claimed 3+ towers so that your troop begins earning double trophies for the rest of their energy.  Keep an eye on the other troop's activity and concentrate on claiming three towers as early as possible.  These three towers will win you the match as you'll gain the majority of points available, and your troop will gain double trophies for each attack.

Achieving a quick solid claim on three towers often deters the enemy troop from using saved energy or spending as it may "cost" them too much to win double trophies (claim 3 towers) for themselves, and they may wait for an easier match.  Early energy use by as many troop members as possible is the key to winning matches.

Having high power ratings or event monsters to increase your attacks makes claiming towers easier.


Which tower should I attack?

There are two factors to take into account in determining where you'll achieve the highest damage: element and zodiac.

Each tower takes on the element of the tower. For example, the leaf tower will behave as a leaf monster, giving fire monsters an attack boost and water monsters will do reduced damage.  If you have a fire mono team, you'll achieve the highest attacks against the leaf tower.

Every tower, except rock, also has a zodiac boost of 25%.  These zodiac boosts are static and remain constant between Dominion events.  Any monster in your team with the same zodiac as the tower will receive a 25% attack bonus.

Leaf Tower - Autumn: Libra, Scorpio, Sagittarius
Fire Tower - Spring: Aries, Taurus, Gemini
Water Tower - Winter: Capricorn, Aquarius, Pisces
Wind Tower - Summer: Cancer, Leo, Virgo
Rock Tower: No zodiac bonus

An ideal team matches the element bonus with the zodiac bonus. e.g. Sagittarius fire team against the leaf tower.

If the zodiac(s) or element(s) of your team don't match a specific tower, try a single energy against the towers that are likely to be good for your team and compare the damage that you can achieve.


What monsters should I have on my team?

Aside from taking into account the element and zodiacs of the tower you want to attack, the next consideration is the actives of your team's monsters.  The towers do not attack your team, so no healers or defensive monsters are needed.  The tower is also a single target, making actives like snipe (single target attack) more effective than something like blast (multi-target attack).

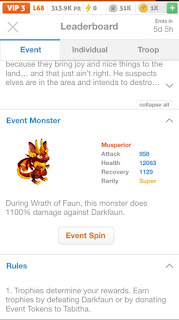
Event monsters have a significant bonus against their opposite element.  A fire event monster will only have a bonus against the leaf tower, for example.  Event monsters can be spun from within the Event tab (click the "E" on the top left corner of your screen and then click "Event Spin") for 50 gold/spin.  After attacking within the event screen you may be randomly offered a "lucky spin" that will have 3x the drop rate of event epics, again at a cost of 50 gold/spin.  Dominion monsters have a high value among traders.

The damage of this event epic will be multiplied by 12 against the leaf tower only


How to read tower information

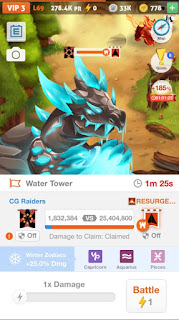
Example 1: A tower claimed by your troop


The first indication that your troop is holding this tower is the damage bar between the two troop flags above the tower itself.  Your troop's damage is shown as a percentage in blue and the enemy troop's damage percentage is red.  Our troop claimed this tower (more blue damage than red) and this is indicated by the blue castle showing on the left of this bar.

Clicking on the tower brings up the information shown above.  The actual damage is now shown above the damage bar.  The tower is listed as "Claimed" below the damage bar, and the blue castle icon now appears on our flag.

Both shields are off in the example above, as seen by the shield button below each troop's flag.

The zodiacs that receive the 25% bonus attack are displayed here.

At the bottom of this screen, you can choose how many energy to use against the tower - your regular damage will be multiplied by this factor.


Example 2: A tower claimed by the enemy troop

This screen can be read as per the previous example.  The enemy troop has more damage against this tower, indicated by the significant red percentage of the bar and the red castle icon shown on both damage bars.

Advanced troop strategy option

When you click on a tower, an option exists for your troop to donate 10 specials of the same element as the tower in order to activate a shield.  This shield will reduce the enemy's attacks on that tower by 25%, making it harder for them to claim the tower.  The shield also appears to add in an extra animation delay, further reducing the damage capabilities slightly for your enemy troop.

Unless the match is particularly significant to win, most troops don't use specials in this manner.  To donate specials, click on the tower of interest, then the shield button below your troop's flag. A special donation screen will open up.

 Click on the Shield button below your troop's flag to donate specials


Advanced team/gem-matching strategy

For players working on teams that only contain Dominion event monsters, the general consensus (from Battle Camp Global on Facebook) on team building is to either play with 5 snipes, or 4 snipes and one swap/eswap.  In both cases, the aim is to rely on the damage of your actives (snipes) alone.  Each turn, make one 3 gem match in an element you don't have - no combinations and no actual attacks.  This single match is enough to bring your actives closer to activating without taking up any time animating an attack.  The idea is that most damage will come from the high powered snipes with the event bonus, and if you try attacking in between the snipes you'll lose time and will reduce the number of snipes you can fit into your minute.  

In the last few seconds of either method, aim for one really long turn (generally going into overtime) using up as many attack combinations as you can.  If you're using a 5 snipe team, match the attack element gems that you need which have accumulated within your minute. If you're using the 4 snipe and 1 swap/eswap method, manually activate the swap only in these last few seconds so that you can have a really big attack turn at the end (to make up for the missing snipe monster).

The reason for avoiding using both a swap and an eswap is that you're aiming to only have a single long turn at the end.  Activating both at once is likely to fill your board with interconnecting patterns of gems reducing the individual combos and damage done.  Activating them over 2 separate turns takes too much time away from the snipe activations that you're aiming for.


Official Pennypop Guide:


Extra Information: Event Monsters, Damage Calculations & Boosters
(Thank you to our anonymous commenter below for suggesting this addition)

The bonuses applied to the base attack (or health/recovery) stat are all additive, not multiplicative as most of us intuitively assume.

Using Dominion as an example: An event super may have 600% bonus, 55% bonus from lethal, 15% bonus from your zodiac leveling, 25% bonus from the zodiac boost on a tower and 100% if you activate a booster. The total bonus applied to the base attack stat then becomes 795%.

The booster doesn't double all the other bonuses unfortunately.

More details are available below in the screenshot taken from the game's official help page at pennypop.com/help .


Monday, October 12, 2015

List of Daily Reward Gifts

The daily rewards have been changed in April 2017 and the list below is no longer accurate.  Please click here to see the list of the new Daily Rewards.


Here is the list of daily rewards that you receive when you log into Battle Camp daily.

  1. 50 Stones
  2. 1 Rare (Hoverborg)
  3. 5 Energy
  4. 1 Avatar Spin
  5. 5 Energy
  6. 250 Stones
  7. 1 Stone Finder Booster
  8. 5 Energy
  9. 1 Monster Spin
  10. 1 Special
  11. 1 Luck Booster
  12. 5 Energy
  13. 1 Avatar Spin
  14. 2 Monster Spins
  15. 250 Stone
  16. 1 Monster Spin
  17. 1 Feeding Booster
  18. 5 Energy
  19. 1 Rock Booster
  20. 250 Stones
  21. 1 Fire Booster
  22. 10 Energy
  23. 1 Water Booster
  24. 1 Monster Spin
  25. 1 Leaf Booster
  26. 2 Monster Spins
  27. 500 Stone
  28. 1 Wind Booster
  29. 10 Energy
  30. 1 Avatar Spin
The daily reward gift cycle is not universal for all players - everyone in your troop is likely to be at a different part of this cycle, based on the day they began playing.

I'm not entirely sure what happens when you skip a day (I'm a little too addicted for that to have happened) but I believe that the daily rewards wait for your return and that you need to work through all 30 before they reset to the beginning again.  (If anyone can confirm this, please let me know!)

Sunday, October 11, 2015

Beginner's Guide to River Crossing & Winter Peak

River Crossing and Winter Peak are the two locations in the game where 10 day Raid Events take place.  The appearance, raid bosses and event monsters change each time, however the format remains constant.  Raid bosses (and commons) in River Crossing tend to be leaf or water, and in Winter Peak they tend to be wind, rock or fire.


Key Features of the Event:

  • Common monsters to battle
  • Mini-boss
  • Raid boss
  • Tvt Ranger
  • Trader & Event Tokens
  • Event Monsters
  • Event Specials

Common Monsters

These monster battles take place the same way that normally happens in the regular map areas of the game.  You'll face common monsters, possibly a rare or a special or an event special (see below for more information). In order to fight the mini-boss, you will need to complete a certain number of common monster battles first. (Click on the mini-boss to find out how many).

From these common monster battles, you'll receive common monsters, pieces of rares, specials, event specials, stones and/or event tokens (see below for more information).

A new feature was introduced during October, 2015, in which you can use multiple energies to complete multiple common battles at once. This can save time when you have 10 common battles to defeat before you can unlock the mini-boss.  Many people have enjoyed that the reward from the single battle is multiplied by the amount of energy used - a single special dropping from the battle becomes 5 specials if you used 5 energy.

Slider can be adjusted to use multiple energy in common battles

Double stone + 2 Event Specials won from using 2 Energy


How to identify the mini-boss and raid boss.

Each raid event will have a mini-boss and a raid boss, each labelled with "Boss".  They will look different between events and will appear in different places, however they can easily be identified by clicking on them.  The mini-boss is always smaller, and clicking on it will bring up a message about how many common battles you need to face before you can battle the mini-boss to win event specials and event tokens.  The raid boss is bigger in size and will bring up a screen to show how many event specials your troop needs to donate in order to be able to battle the raid boss.

Mini boss (left) and the mini-boss raid engagement screen (right)

Raid boss with the event special donation screen open


More about the mini-boss

Mini-boss battles vary between events, so a complete description cannot be provided here, however there are usually a number of waves of monsters to defeat.  There is always an option to set the difficult of your mini-boss battle, with higher difficulties rewarded with additional trophies.  If you set the difficulty too hard, you can choose to try again when you have sufficient energy or wait for 30 minutes until the difficulty setting resets and you can adjust it to an easier level.  The main purpose of mini-boss battles is to collect event specials to donate to the raid boss.  Many people use them as a way to collect event tokens as well.  

Victory screen from defeating the mini-boss on hard

At the start of the event, you'll need to defeat two common monsters within the event screen in order to engage the mini-boss. Each time you defeat the mini-boss, the required number of common monster battles will go up by two, until you reach the maximum of ten.


More about the raid boss

Once again, the raid boss changes between events, not just in appearance but also its element, its active ability and its danger bar (if raiding on hard/extreme).  The main purpose behind battling the raid boss is to win trophies.  Trophies are generally allocated at a rate of 1 trophy per 1000 points of damage.

The number of event special donations goes up with each raid completed, until it reaches a maximum donation level of around 40 event specials.  When your troop has donated sufficient event specials, the raid boss will be ready for your troop admins to engage. Your troop admins will have a choice of setting the difficulty level for the raid, and you'll then have 8 hours in which to defeat the raid boss together.  Failure to finish in time will result in no trophies being awarded.  Each time the raid boss is defeated, it will gain more health points to be harder to defeat next time (even on the same difficulty setting). It's common to start the raid event on the hardest level you believe your troop can complete. Once that level becomes too difficult, drop down to the next hardest setting, this will reduce the number of trophies available but allow you to finish raids once more.

In all raid events, running a raid on extreme will give your troop members a small chance of being awarded a crystal or candy on completion.  The top 5 attackers (by percentage competed) within that raid receive twice the chance of a crystal/candy dropping.  In some recent raid events, running the raid on either extreme or hard will give a (seemingly smaller) chance for a reward epic to drop.

Raid bosses run on hard or extreme will have a danger bar to take into consideration. Easy and medium raids are more straight forward.  Each raid will be randomly allocated a "season" - three zodiacs whose monsters will receive a 25% attack bonus.

Halfway through the event, the raid boss will have a chance to become enraged when your troop admin engages it.  If enraged, it's appearance will change - it usually grows in size and becomes more menacing.  An enraged boss has more health, making it harder to defeat, but will award 2x trophies at the completion.  There is no way to tell ahead of time whether the raid boss will be enraged - something to take into account when your troop is starting to struggle to complete regular raids.


TvT Ranger

I'm not sure what this ranger is actually called within the game but it has a consistent "black wolf" appearance that is readily spotted around the event screen. Clicking on this ranger will let you know how long it will be until the next troop vs troop (TvT) match is underway. These always run for 1 hour, at 12 hourly intervals throughout the event.


TvT is the easiest way to gain trophies during a raid event.  The battle is always against a single boss at a medium difficulty level (no danger bar).  The element and active ability (if any) will be the same as the regular raid boss.

At the start of the TvT match, your troop will be matched against a troop who has similar trophies to your troop. (The strength of your players is not taken into account, only trophies earned).  At the end of the match, if your troop earned more trophies within that hour long match than the other troop, you'll be declared the "winner" and your troop members will receive 1.5x bonus trophies (on top of their original trophies).  If your troop has lost, you'll still receive 1.25x bonus trophies.  Either way, more trophies are granted per energy use than regular raids.  For spenders, this is the best way way to win trophies quickly.


Trader & Event tokens

Within the event screens of 10 day raid events, arena events and celestial towers events, you'll always find a Trader on the screen.  Their appearance may change but they're identifiable by the "Trader" title above their avatar.  Clicking on the Trader will bring up a screen showing you what you can buy with your event tokens.  Event tokens are a universal currency between these three events and can be carried over for use in future events.  Spending these event tokens with a Trader is their only purpose in the game.


For players with lower power ratings (PR), event tokens can be a wonderful way to buy yourself event supers.  It's common practice to collect 500 event tokens to be able to purchase two event supers so you can later evolve them.  These event supers are the same as those that can won through the event spins (50 gold/spin), but come at feeding level 1 - you'll need to feed them up before they'll be effective.  (See below for more information on event monsters).

For players who no longer need event supers (usually high PR players), event tokens may be spent on event costumes (never repeated) or to buy specials if an evolution of event monsters is needed at short notice.

It's not a common practice to buy trophies or energy with event tokens, though some people still do.


Event Monsters

Event monsters are monsters that are released only for events and they have an attack bonus during that event.  For 10 day raid events, Arena events and Celestial Towers events, the event monsters are rarely repeated.  This means that they'll gain their event bonus for the duration of the event, but are unlikely to have their bonus activated again in future events.  The bonus will be active during mini-boss battles, raid boss battles and TvT matches.

Event supers can be purchased with event tokens at the trader.

Event monsters are predominantly won by buying spins (50 gold/spin) during the event for a chance to win event monsters or regular monsters.  There are two ways to spin for event monsters.  The most reliable method is to click on the event "E" in the top left of your screen, and scroll down to a description of an event monster with an event spin button.  This will open the event spin window, which operates in the same manner as normal (ultimate) spins but with event monsters added into the mix.  The alternative method is to wait until a "Lucky spin" is offered to you while battling around the event screen as these have 3x the drop rate for higher order monsters. (Note: lucky spins run during the event from other parts of the Battle Camp map will not include event monsters).  Be aware that the event epic monster will only be released into the spins halfway through the event.  Event monsters won from these spins will come either at the maximum feeding level or halfway.


Click on the Event "E" button to access the Event Spin, rules and leaderboards


Event Specials

The purpose of event specials is *only* to be donated to the event raid boss.  Even though they come as "potent", "charged" or "energized", do not try to level them up to feed your monsters.  They have the same feeding value (100) as common monsters, unlike regular specials with a higher feeding value (800).  Event specials have a different appearance each event and have no purpose in the game after the event ends.


More information about the current event can be found by clicking on the event "E" button on your screen and scrolling through the rules and information provided.  The leaderboards are also available here so that you can see the prize that you are in the running to receive individually and for your troop.  Benchmark prizes for winning certain amounts of trophies are also listed here.